This Mocha Milk Cake is made with an espresso sponge soaked in a brown sugar coffee mix, and finished with chocolate whipped cream and cocoa.
I am so excited to finally share this recipe! It’s been sitting in my archives, having been filmed and shot months ago.
In all honestly I have no idea why it’s taken me so long, but I promise it’s worth the wait.
This Mocha Milk Cake has to be one of my favourite desserts that I’ve made this year (so far). As a lover of all this coffee and chocolate, this ticked all the boxes for me.
If you’re also coffee obsessed and chocolate obsessed, I have no doubt this will tick all the boxes for you too.
Mocha Milk Cake
Imagine a mocha in cake form, but a milk cake form. For anyone unfamiliar with mocha, it is fusion of espresso and hot chocolate. It has the richness of chocolate married with the depth and bitter notes of coffee.
Heaven.
But to make it into a milk cake means incorporating all the flavours in a way that allows them all to shine individually. Whilst coming together to form a complete mocha flavour.
In order to this, we’ve got 3 essential layers here. The first layer is an espresso sponge, which gets soaked in a brown sugar coffee mix (our second layer). Finally to top it all of is a smooth chocolate whipped cream dusted generously with cocoa powder.

Yes, it’s inspired by a Tres Leches, but no, it isn’t one
It is indeed inspired by a tres leches, however I have not called it one as it is in fact not a tres leches.
Tres leches directly translates to ‘three milks’ and is a popular Latin American cake. The ‘three milks’ refers to the combination of milks that are used to soak the cake in. The cake portion of the tres leches consists of a super light sponge which is not too dissimilar to an angel cake.
The sponge is then pierced all over and the milk mix poured on top and allowed to soak in.
In this Mocha Milk Cake, we are only utilising one of the three milks, hence making it more of an ‘una leche’ rather than a tres leches. But I do love tres leches cakes!

What is mocha? And what’s so great about it?
A mocha is a kind of crossover between a latte and a hot chocolate. It’s often made as a regular latte with the addition of a chocolate syrup.
It’s a hugely popular drink and it’s quite delicious too! It has the richness and sweetness of chocolate paired with the depth and bitter tones of espresso.
It’s smooth, creamy, silky, and rich. I’m an avid espresso and coffee fan, and a well made mocha is honestly a real treat.
This is an eggless Mocha Milk Cake
Yes it is! So whether you’re allergic to eggs, don’t eat them, or just don’t have them on hand, my recipes are here for you.
Without eggs we do have a slightly different method to a typical milk cake. As traditionally a milk cake requires egg yolks and egg whites to make a super soft sponge. Normally a chiffon type of sponge is used – which is perfect for soaking in all the milk.
We have more of a regular soft sponge here, and it still has great absorbing ability!

You can also make this milk cake VEGAN
A few simple substitutes is all you need. There’s no milk in the actual sponge which means the espresso sponge is already vegan.
The evaporated milk in the brown sugar coffee mixture can be substituted for a plant based evaporated milk. I’ve seen a few coconut based ones which will work well. I haven’t tested this myself, but I think a barista style oat milk would work really well too.
The double cream/heavy whipping cream in the whipped cream can be substituted for coconut whipping cream. And that’s all you need to do to make this Mocha Milk Cake vegan.

How to make a really good coffee sponge cake
The main flavour and component of this sponge is indeed the coffee. That’s the entire flavour profile and the foundation for this dessert. So it’s really important to make sure it’s a coffee flavour that you like.
Personally, I’m a huge fan of coffee made from beans. Either via a coffee machine or a moka pot. The flavour in the espresso from both is pronounced and deep.
However I know a lot of people may not have access to either and hence I’d recommend using an instant espresso powder or an instant coffee powder that you really like.

What you’ll need
The full recipe can be found at the end of the blogpost
For the espresso sponge:
- Self raising flour – this is essentially an all purpose/plain flour with added raising agents. I always find this to be superior than using PF/APF and then adding raising agents. The rise and texture just ends up being a lot better
- Baking powder – for extra leavening
- Sugar
- Neutral flavoured oil
- Vanilla bean paste – or extract/essence
- Espresso – or black coffee. I’ll have the full details included in the recipe at the end of the blogpost on how to make this
For the soaking milk mixture:
- Brown sugar – I like to use dark brown sugar due to the higher quantity of molasses. This provides more depth and a caramel note to the mixture. But feel free to use light brown sugar or even white sugar if you prefer
- Espresso or black coffee
- Evaporated milk – this does not have sugar added to it like condensed milk. It is thinner and less viscous
And finally for the chocolate whipped cream:
- Double cream – also known as heavy whipping cream in the US
- Icing sugar – also known as powdered sugar
- Cocoa powder – not hot chocolate powder please!
- Additional milk if needed to thin out the whipped cream
How to make this Mocha Milk Cake
Let’s start with the espresso sponge


1) Start by either pulling your espresso shots, or making it in a moka pot, or making your instant espresso/coffee
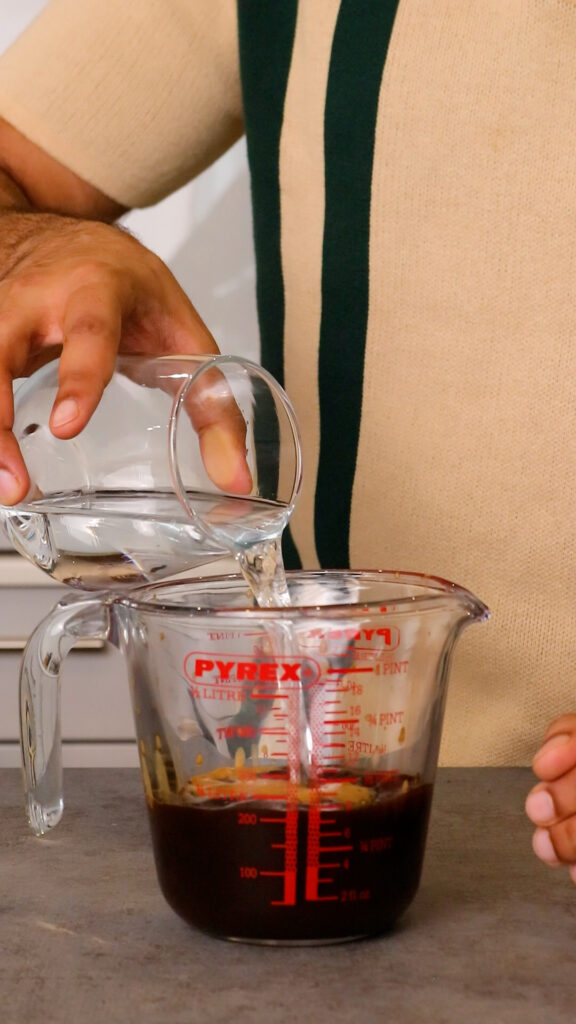
2) Dilute it down with cold water (this will also bring the temperature down). Room temperature ingredients are always the best for cakes


3) Add oil, sugar, and vanilla to a mixing bowl
4) Pour in the espresso mixture and whisk it all together


5) Sift in the flour, baking powder, and salt
6) Whisk until most incorporated and then fold into a smooth-ish batter. A few lumps are totally fine


7) Pour the batter into a greased and lined tray, and gently tap on the counter to remove any large bubbles
8) And bake!

9) Once baked, allow to cool for 15 minutes inside the tin, then remove the sponge from the tin and allow to cool completely
And then for the brown sugar coffee mix


1) Mix together brown sugar and espresso/instant coffee
2) Then add a tin of evaporated milk and whisk to combine


3) Place the cooled sponge back into the tray and poke holes all over and all the way through. I’ve used a chopstick to do this
4) Pour the brown sugar coffee mixture all over, cover the tray with a lid or clingfilm and place into the refrigerator for a minimum of 4 hours
And finally for the chocolate whipped cream


1) Add double cream/heavy whipping cream to a mixing bowl along with icing sugar/powdered sugar. Then sift in the cocoa powder to remove any lumps
2) Whisk together until stiff peaks. UK double cream tends to be higher in fat content than the US heavy whipping creams, and hence can become too thick. If this happens fold in 1 tbsp of milk at a time. Do not whisk it in as you will cause the whipped cream to split and become grainy


3) This is how the final whipped cream should look
4) Spoon on top of the soaked sponge


5) Smooth over as best as you can, no need for perfection!
6) Cut into 8 large slices or 12 regular slices

7) Then finally dust with plenty of cocoa powder
Frequently asked questions
Can this Mocha Milk Cake be made vegan?
Yes it can, I’ve got a section dedicated to this in the blogpost. It’s super easy to do!
Can evaporated milk be made at home if we don’t have access to it?
Yes, you just need double the amount of milk (820g of full fat milk) and you want to place it on a gentle simmer in a non-stick pan until it reduces by half in volume. Then pass through sieve and you’ve just made yourself some evaporated milk!
It doesn’t need to be totally precise for this recipe, so just aim for around 410g of evaporated milk at the end, if you’re slightly short, add some milk to it.
How long can the cake be kept?
This cake will last up to 5 days refrigerated. Keep it covered with a lid or clingfilm. It actually tastes even better day by day, so feel free to make it in advance.
How to get an even soak throughout the entire sponge
Pour over the milk mixture gently and slowly. And you can even pour it in batches with a ladle to ensure the entire sponge is evenly soaked
Can we turn this into a regular mocha cake?
I have my mocha sponge cake recipe for you right here!

If you enjoyed this recipe
Please do let me know! Leave a review and a rating below, I’d love to know how you got on.
You can also tag me on Instagram at @dish_by_rish. Or follow me on Facebook, Pinterest, Youtube, and TikTok to keep up with all my cooking and baking creations.
Until then, happy baking!

Mocha Milk Cake
This Mocha Milk Cake is made with an espresso sponge soaked in a brown sugar coffee mix, and finished with chocolate whipped cream and cocoa.
Ingredients
For the espresso sponge:
- 355g self raising flour
- 6g baking powder, (equivalent to 1+1/2tsp)
- Pinch of salt
- 175ml neutral oil, e.g. sunflower, vegetable, rapeseed
- 220g white granulated sugar
- 1tsp vanilla bean paste, or extract/essence
- 250ml black coffee, I've used espresso (*see notes)
For the brown sugar coffee mixture:
- 50g dark brown sugar, light brown sugar/white sugar will work as substitutes
- 80ml espresso or black coffee, (*see notes)
- 410g evaporated milk
For the chocolate whipped cream:
- 300ml double cream/heavy whipping cream
- 40g icing sugar/powdered sugar
- 35g cocoa powder, plus extra for dusting on top
- 2-3tbsp of milk (if needed)
Instructions
For the espresso sponge:
- Preheat your oven to 150'C fan/170'C conventional - 300'F fan/340'F conventional
- Start by either pulling your espresso shots, or making it in a moka pot, or making your instant espresso/coffee. Then dilute it down with water to make a total of 250ml coffee. You can adapt the strength of the coffee based on your personal preference
- Add the oil, white sugar, and vanilla to a large mixing bowl, then pour in the coffee mixture and whisk to combine
- Sift in the flour, baking powder, and salt. Then briefly whisk until mostly incorporated. Then fold into a smooth batter - a few lumps are totally fine
- Pour into a greased and lined 31x20x7cm tray and bake for 45-50 minutes or until a skewer comes out clean
- Allow to cool in the tin for 15 minutes, then remove the sponge and place on a wire rack until cooled completely
For the brown sugar coffee:
- Mix together brown sugar, more espresso/black coffee, and evaporated milk. You should have a total of around 500ml of the brown sugar coffee
- Place the cooled sponge back into the same tray and poke holes all over with a chopstick or a fork. Slowly pour the brown sugar coffee all over ensuring even coverage. For best results, soak in 1 ladle of coffee at a time in 5 minute intervals
- Cover the tray with a lid or clingfilm and place into the refrigerator for a minimum of 4 hours
For the chocolate whipped cream:
- Pour the double cream/heavy whipping cream into a large mixing bowl along with the icing sugar. Sift in the cocoa powder to remove any lumps
- Whisk together until stiff peaks. UK double cream tends to be higher in fat content than the US heavy whipping creams, and hence can become overly thick quite quickly. If this happens fold in 1 tbsp of milk at a time. Do not whisk it in as you will cause the whipped cream to split and become grainy
- Spoon the whipped cream on top of the chilled sponge and spread evenly
- Cut into 8 large slices or 12 regular slices, then dust generously with more cocoa powder before serving
Notes
- I've used 120ml espresso (equivalent to 3 double shots with 19g beans each time) which was then diluted with water to 250ml for the sponge. And 2 double shots with 19g beans each time to make the 80ml for the soaking mixture
- The espresso I've used in this recipe was a dark roast (personal preference) with 19g of beans in the portafilter. Each shot was pulled at a ratio of 1:2.1 (19g of beans to 40g of espresso). This precision is not necessary at all, but for those of you with a manual espresso machine - this may be handy
- Instant coffee and instant espresso will also work too, as will moka pot espresso. For instant coffee please follow the recommended instructions on your packaging to make the required amount of coffee. This will vary between products
Nutrition Information
Yield 12 Serving Size 1Amount Per Serving Calories 530Total Fat 27gSaturated Fat 9gTrans Fat 0gUnsaturated Fat 16gCholesterol 42mgSodium 471mgCarbohydrates 66gFiber 2gSugar 41gProtein 7g
This is an automated calculation and hence may not be completely accurate.


6 Comments
Azizah
July 13, 2023 at 8:52 pmHi Rishi, I always struggle when it comes to using instant coffee in recipes. May I know how many teaspoons of instant coffee powder and how much water I should use as the base before diluting?
dishbyrish
July 14, 2023 at 10:20 amI’m just adding this into the notes of the recipe as we speak 🙂 I always recommend following the instructions on your individual bottle or packet as they’ll have a recommended ratio of instant coffee to water. This will vary between products so it’s difficult to give an exact amount to fit all
Azizah
July 17, 2023 at 3:39 amAlright! Will give it a go! Thank you.
Azizah
July 22, 2023 at 3:24 amI tried this for the weekend! It was a huge hit! Thank you so much!
Azizah
July 22, 2023 at 3:24 amI tried this for the weekend! It was a huge hit! Thank you so much!
Masala Chai Rusk Tiramisu - Dish by Rish
December 18, 2023 at 5:25 pm[…] Mocha Milk Cake […]