Tadka Focaccia

This no-knead Tadka Focaccia is crisp and airy. Topped with a tempering of curry leaves, spices, and aromatics for a fragrant fusion focaccia.
I am without a doubt a bread guy. I’ve always enjoyed the process of working with dough and baking fresh loaves of bread, focaccia, and pizzas. There’s nothing quite like welcoming people over with a fresh loaf of bread, right?
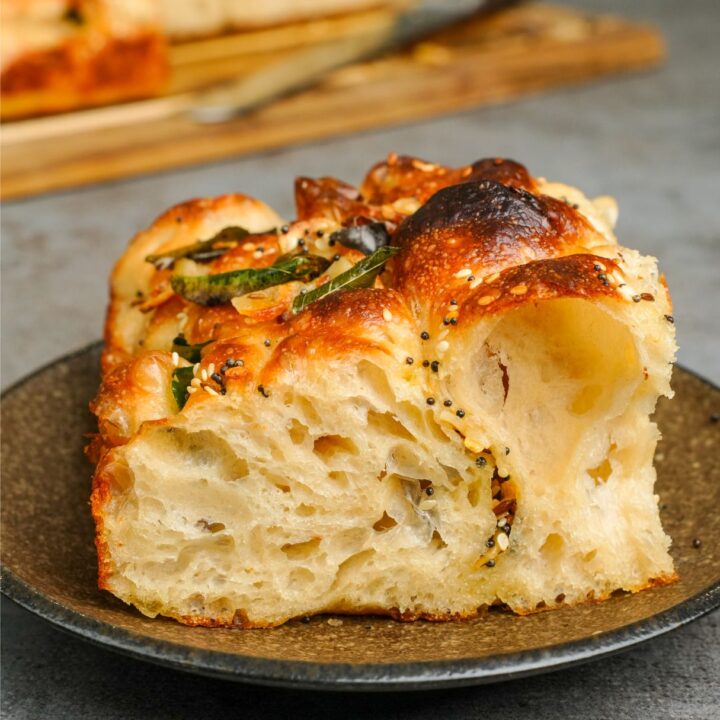
And one of the best types of bread to exist (in my opinion) is a focaccia. It also happens to be one of my favourite breads to make. It’s incredibly airy inside with a rich flavour of olive oil, whilst the outside is crisp, golden, and dimpled.

Tadka Focaccia
This focaccia, however, takes a slightly different route. It does all start off with a very traditional focaccia in terms of the base ingredients and the method.
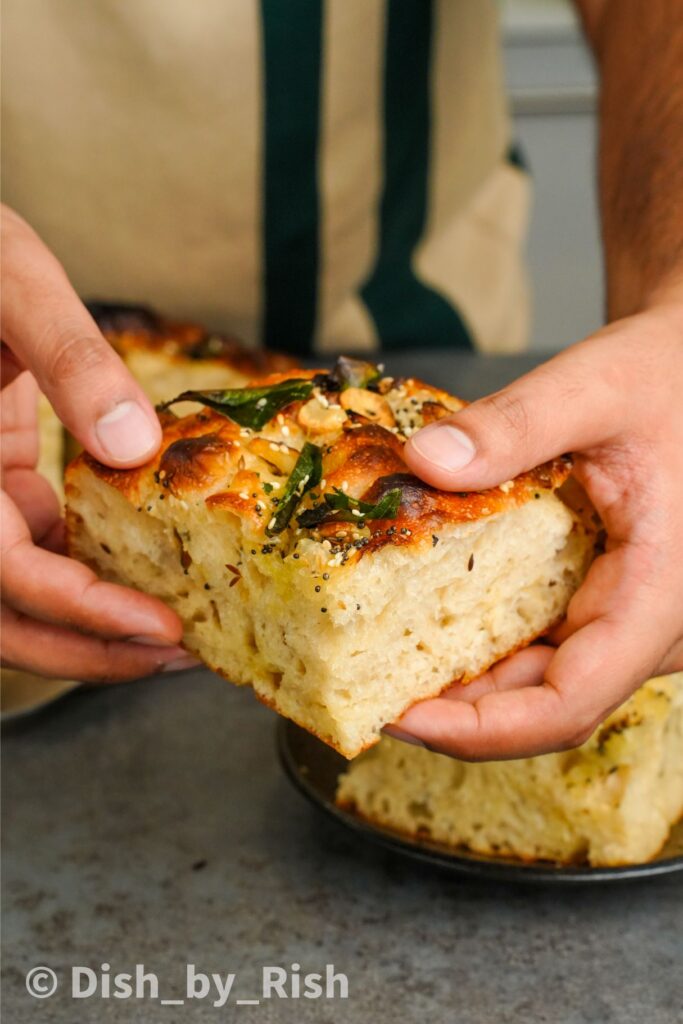
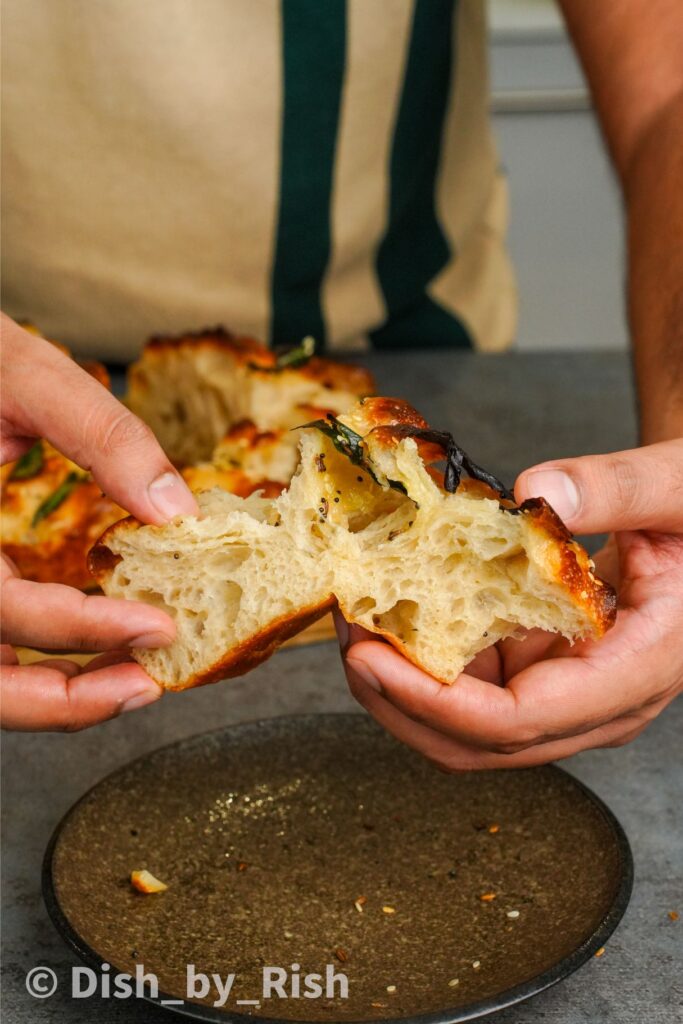
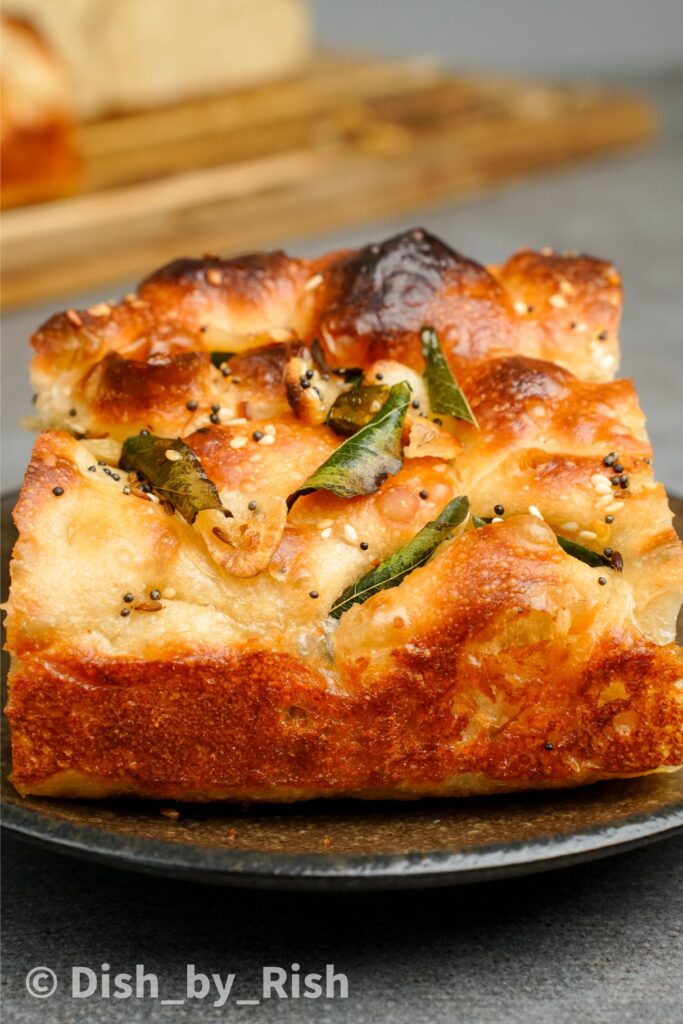
But instead of a classic olive oil/rosemary/garlic topping, we’re adding in a tempering of spices. Spices such as mustard seeds, cumin, sesame seeds, curry leaves, and so on. It adds an incredibly unique flavour profile, and it’s easily become my favourite focaccias to make.

What is focaccia?
Focaccia (pronounced ‘fuh-kah-cha’) is a flat leavened bread with its origins in Italy. It can be leavened with yeast or sourdough starter, and is traditionally based in a large sheet pan.
Focaccia is made with a generous amount of olive oil, which contributes to its flavour and texture. The dough gets dimpled right before baking which creates all the pockets of air that we love in a focaccia.
There are plenty of variations which exist and also a huge number of flavour combinations.
What is tadka?
Tadka (pronounced tur-kah with a roll on the r) is a technique used throughout Indian cooking. It is essentially the tempering of spices and aromatics in some form of fat such as oil, ghee, or butter.
Tadka acts as a method to coax the flavour out of the spices and aromatics. These flavours then bloom in the oil, in turn becoming more intense and robust.
This is a classic focaccia with an Indian twist
The focaccia portion itself stays true to the classic by using the same ingredients and the same method. But we’re marrying it with Indian flavours by adding in the deeply aromatic tadka on top.
If you’re familiar with Indian delicacies, I’d say the tempering on top of the focaccia is not too dissimilar to the one found on top of handvo (a savoury lentil cake). It works perfectly here.

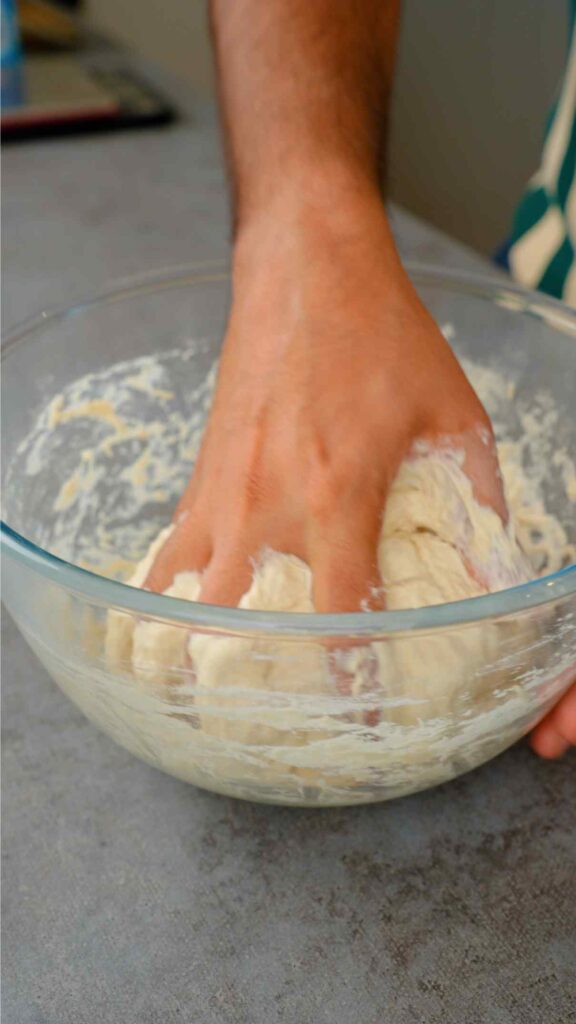
This is a NO KNEAD focaccia recipe
There’s no kneading for this focaccia at all. It’s a high hydration dough, which means there’s a lot of water in relation to the flour.
This makes it incredibly difficult to knead as the dough is super sticky and too soft to manipulate. Instead we’re going to do a series of stretch and folds and this will develop the gluten and structure. It’s so much easier than kneading!

Tadka Focaccia serving suggestions
This is best served on the day it’s made as that is when it’s the most fresh. I really enjoy eating this Tadka Focaccia on its own as a side or appetiser.
But my favourite way to serve this would be as a chutney focaccia sandwich. A smear of some spicy, fragrant coriander chutney on the inside, a few fresh vegetables (tomatoes, cucumber, onions etc), and some fresh mozzarella. It’s honestly heaven.
The secret to an airy and light Tadka Focaccia
- High hydration – the higher the hydration, i.e. the more water there is to flour, the lighter the more airy the crumb structure will be
- Proving the dough sufficiently – underproved dough won’t rise properly and will be dense and gummy. Overproved can range from having a very erratic structure to also being flat and gummy (dependent on how over it is)
- Dimple the dough before baking – this almost disturbs the structure causing a redistribution of air pockets, which is why we see all those wonderful focaccia bubbles during the dimpling process
Let’s talk about some of the ingredients
I’ll cover the main ones below but the full recipe can be found at the end
- Bread flour – bread flour has a higher protein content in comparison to plain flour/all purpose flour. This allows for more gluten development and in turn a better internal structure allowing for more pockets of air
- Yeast – I like to use instant dry yeast in my dough recipes as it has a long shelf life, doesn’t require activating (can be added directly to flour), and its results are consistent. You can use active dry yeast or fresh yeast instead if you wish
- Curry leaves – fresh curry leaves are a key flavour in the tadka, so please use these if you can find them (Indian grocers will stock these and many regular supermarkets now do too)
- Spices – I’m using mustard seeds, cumin seeds, and sesame seeds, which are often the basis for a lot of my tadkas. You could absolutely play around and use whichever spices you like

The KEY tips to getting this Tadka Focaccia right
- Stretching and folding the dough – this is how we’re going to develop the structure that focaccia needs. Set a timer on your phone and make sure you’re there every 15 minutes
- Damp hands – lightly damp your hands whenever manipulating the dough, e.g. during stretching and folding. This will stop it from sticking to your hands
- Cold proving the dough for at least 24 hours – this is where the yeast will slow down. The gluten will continue to develop and strengthen, allowing for a stronger internal structure and more pockets of air. The yeast will also develop more flavourful acids which transform the flavour of the focaccia
- Bake on a HIGH heat – 270’C is the highest my oven goes, but you ideally want the oven as hot as it can go. This creates more oven spring (rise) and retains the moisture in the dough by reducing the bake time. It also creates a more golden and crisp crust
- Use a pizza stone or a baking steel if you have one – pre-heat this in the oven and place your focaccia tray directly on to the steel/stone. It allows for a very quick heat transfer to ensure maximum rise and a perfectly golden base
How to make this Tadka Focaccia
Let’s start by making the focaccia dough


1) Mix together the flour, salt, and yeast. Don’t pour the salt directly on top of the yeast (or vice versa) as it will deactivate it
2) Pour the water into the bowl with the flour mix

3+4) Start mixing everything together either by hand or a fork until it is well mixed and no dry flour remains
5) Cover the dough and allow to sit on the counter at room temperature for 1 hour. This is the autolysis which allows the flour to hydrate and develop gluten
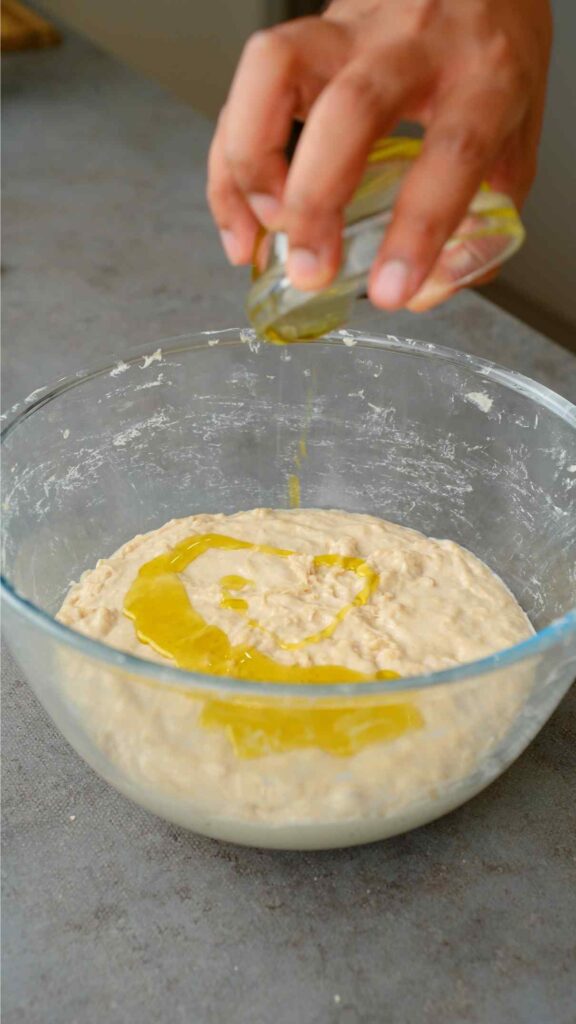
6) After the hour, the dough will already feel stronger and more cohesive. Pour the olive oil directly on top and we can then start doing the stretch and folds
How to do stretch and folds
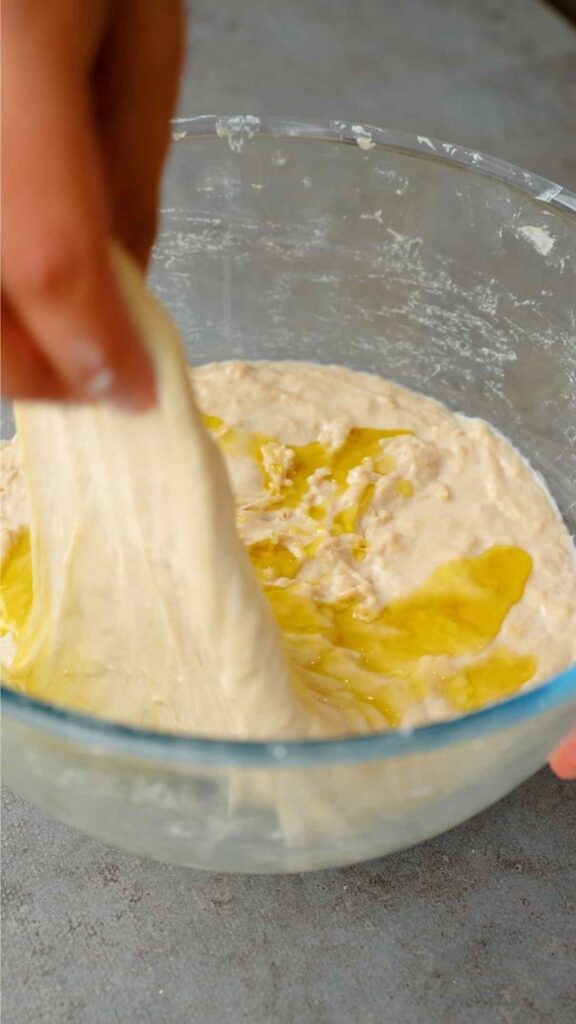
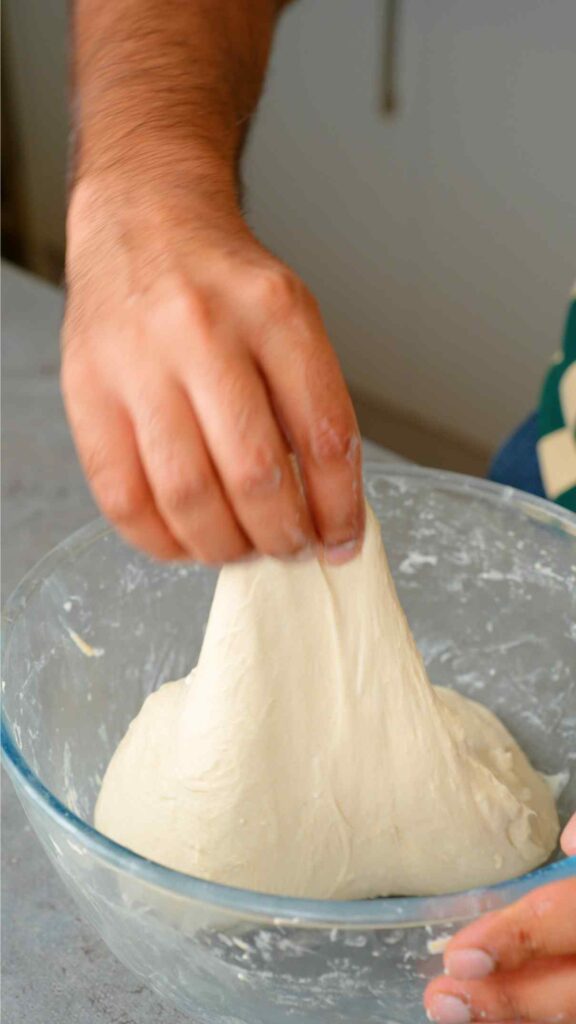
1) Start by dampening you hands in water (to prevent sticking) and then pick up a segment of the dough
2) Fold that segment over to the other side, gently pressing in


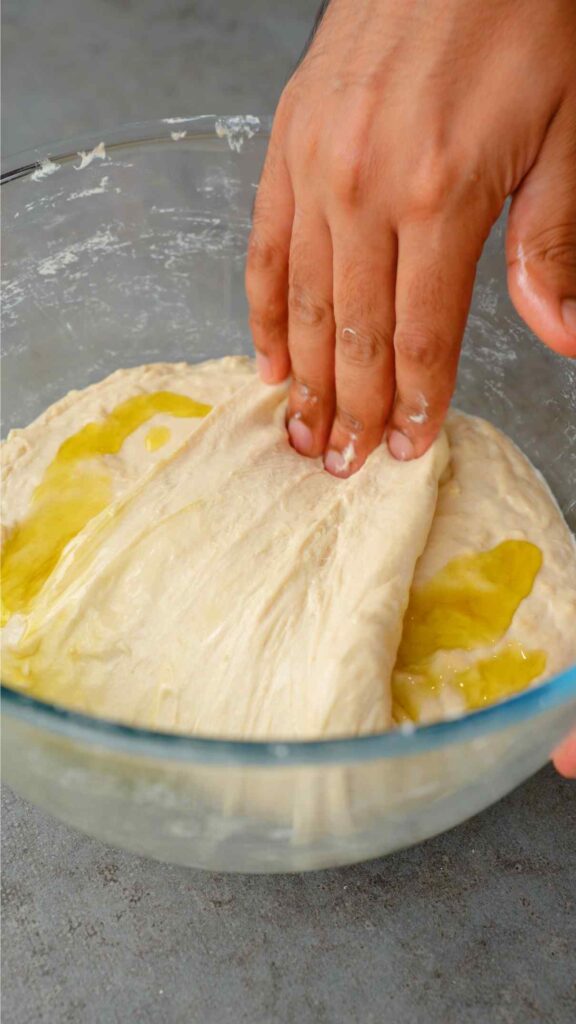
3) Then rotate the bowl and pick up another segment of dough
4) Fold that over again in the same way


5) Keep repeating this as you rotate the bowl, you should get anywhere from 6-8 folds per each stretch and fold cycle
6) After folding, cover the bowl with a lid or clingfilm and allow the dough the rest for 15 minutes. Then repeat the stretch and folds
7) We’ll be doing 4 rounds of stretch and folds, which will take just over 1 hour
8) The focaccia dough will feel stronger and more cohesive after each round as it continues to develop gluten and strengthen
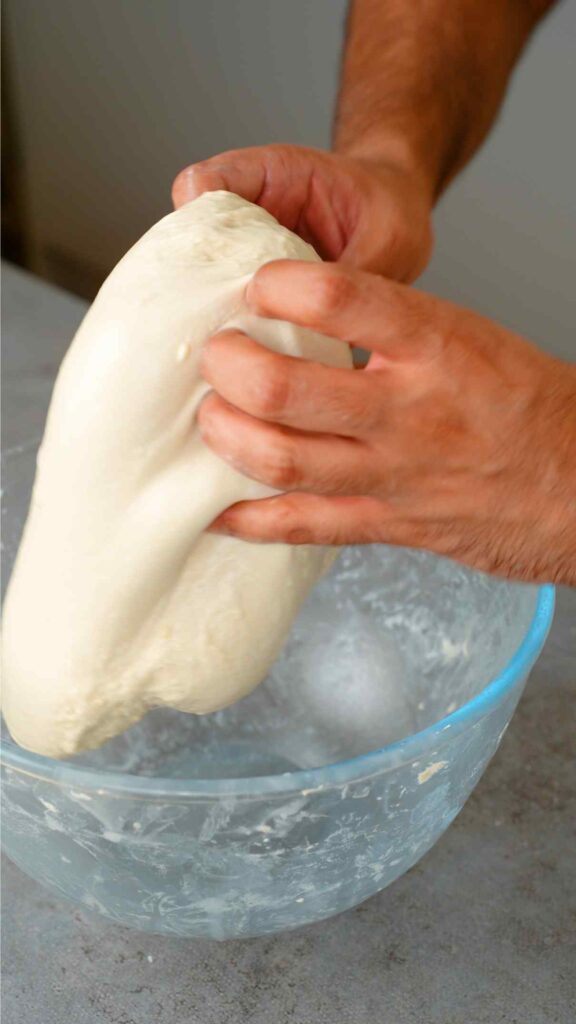
9) Immediately after the final stretch and fold, flip the dough over so it is now seam-side down. With damp hands, just lightly tuck the edges of the dough underneath to form a smooth round dough
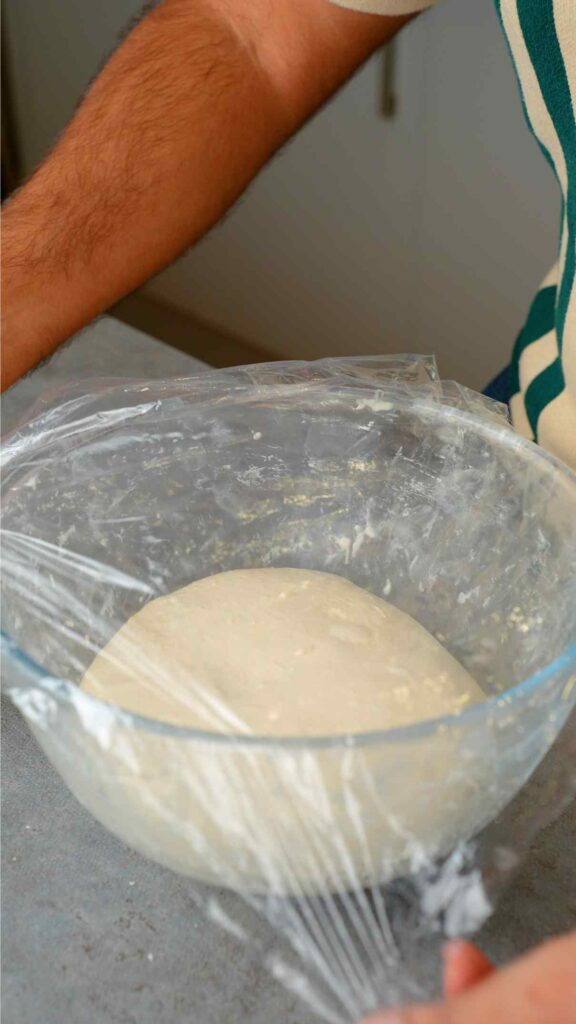
10) Cover with a lid or clingfilm and place into the fridge to cold prove for at least 24 hours
Final shaping for the focaccia dough


1) After the focaccia dough has proved, it will be very bubbly
2) Line the tray with a sheet of baking paper (makes it easier to remove the focaccia) and then drizzle generously with olive oil
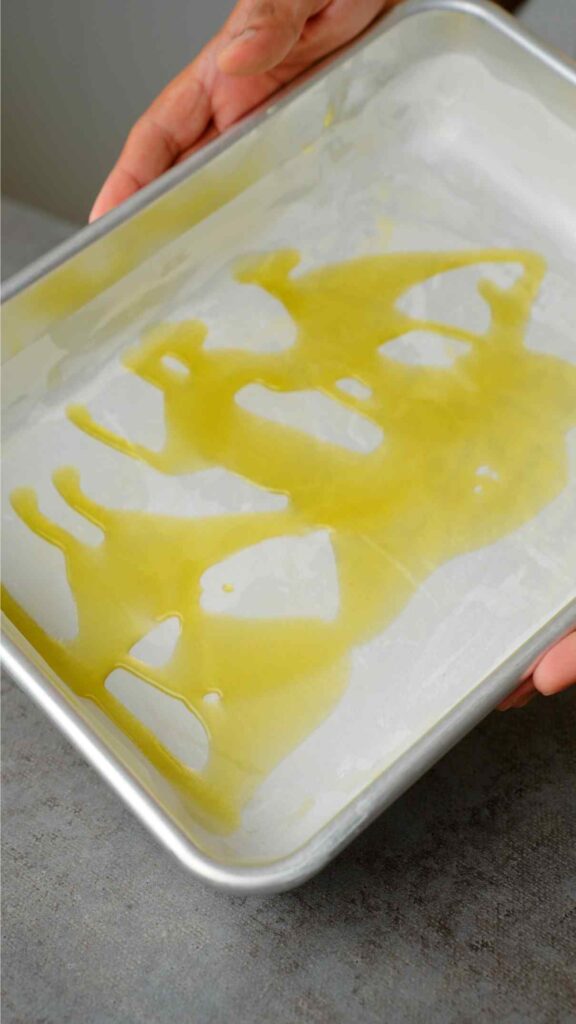

3) Spread the oil evenly across the base of the tray
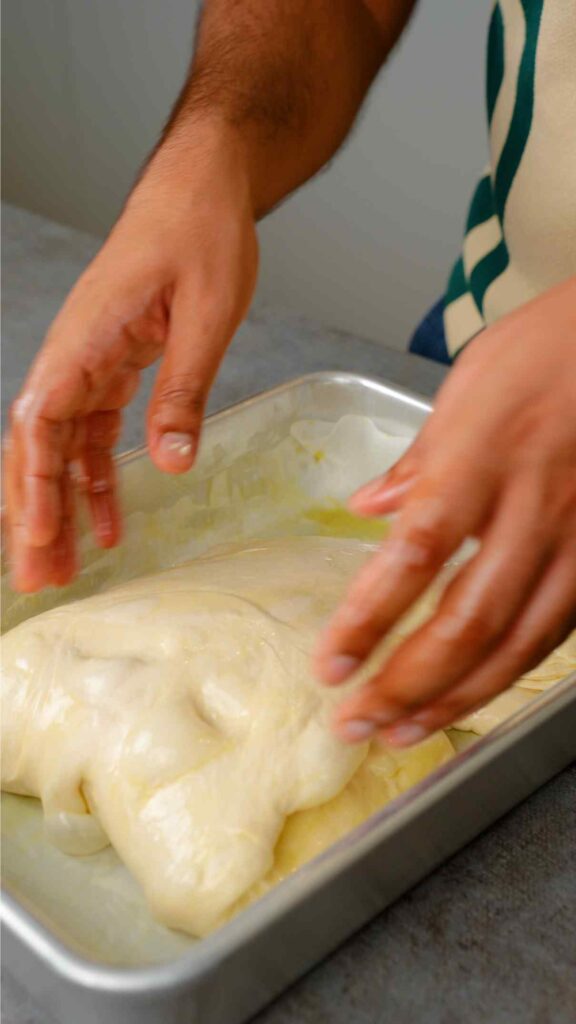
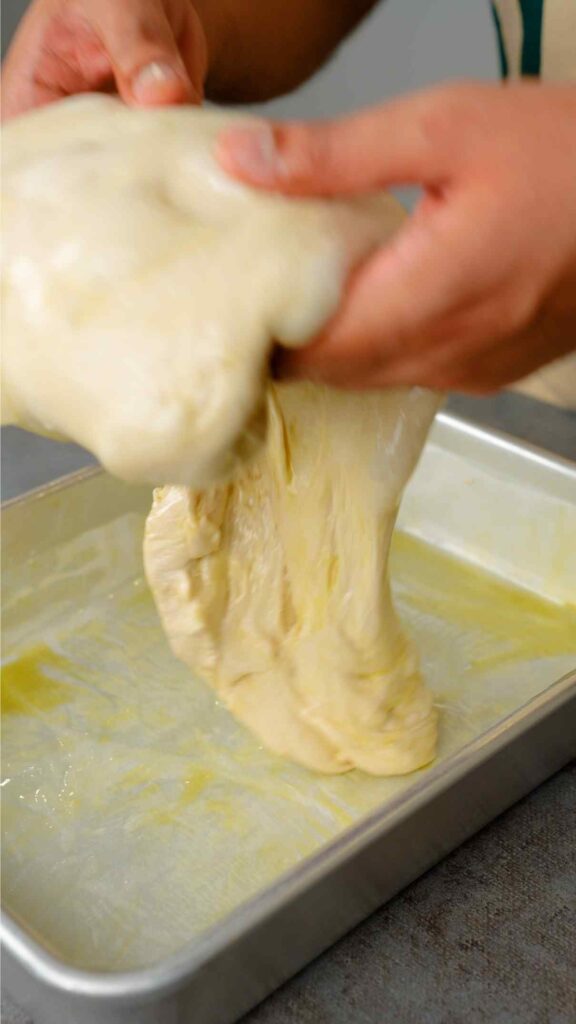
4) Drizzle a small amount of oil around the outside of the dough inside the bowl, and gently remove with either a dough scraper or by hand. There’s no need to punch the dough down, we’re aiming for minimal disruption

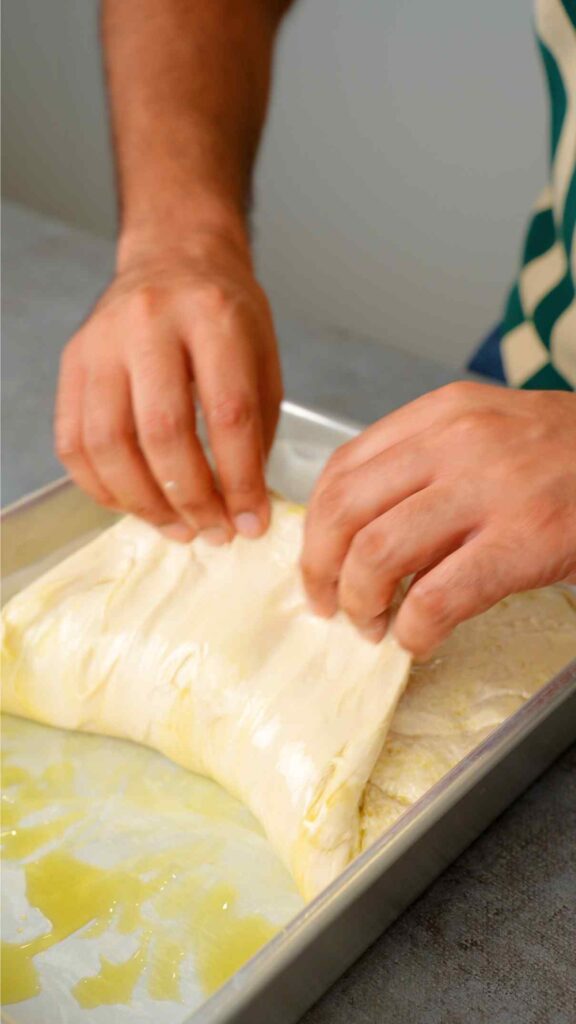
5) The focaccia dough will look rough and not in the ideal shape for this tray – so let’s fix that
6) With oiled hands, grab one end of the dough and fold it over just half way across
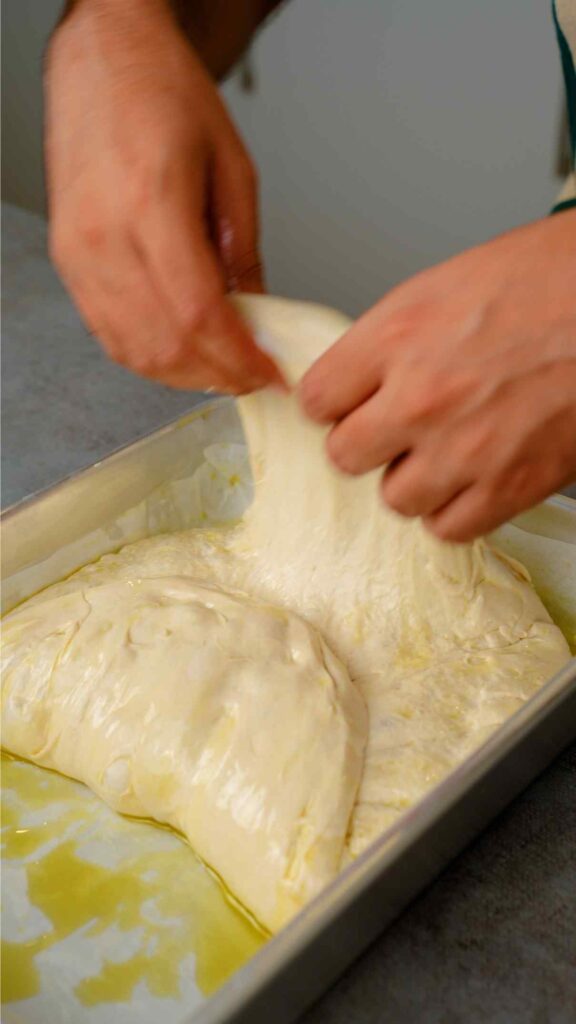

7+8) Repeat on the other side – this is called a letter fold

9+10) Then flip the dough over so that it is seam-side down

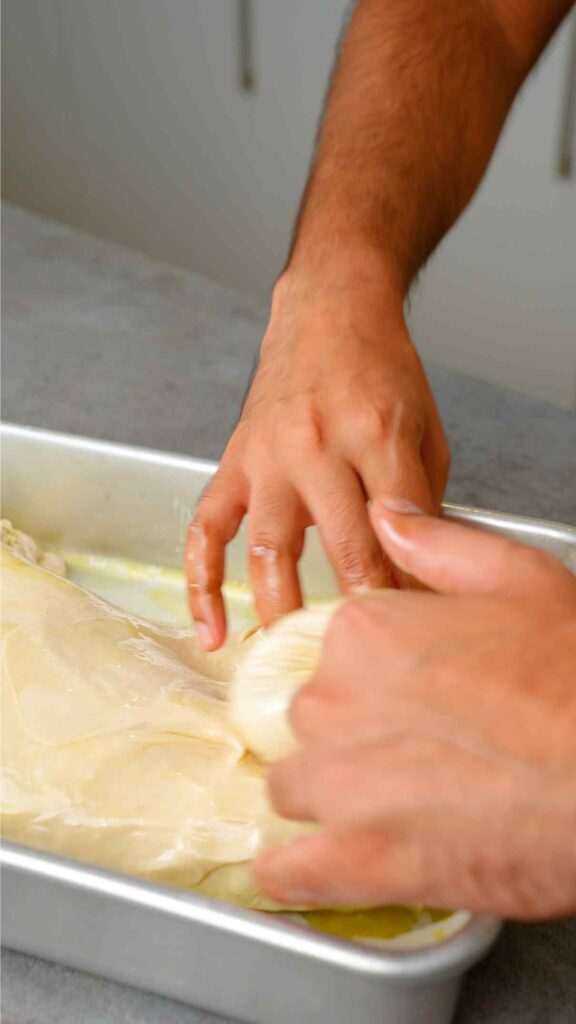
11) We’re now going to do a coil fold which involves lifting the dough up at the mid way point and tucking the end under like 12)
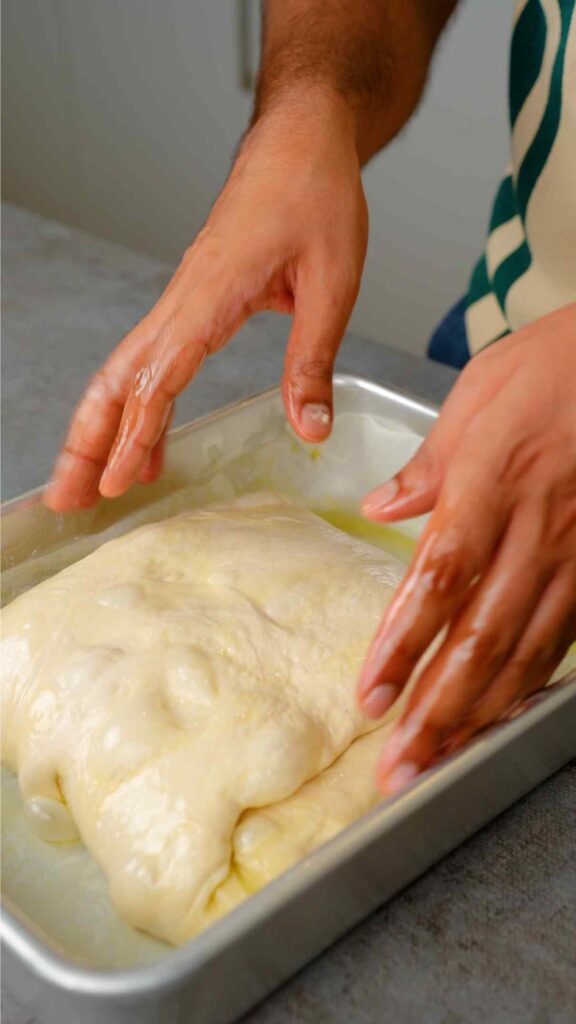
13+14) Repeat the coil fold for the other side, and you’ll now have a perfectly shaped dough. Just shuffle it around a little bit so that is is now centred in the tray. Cover with a lid or clingfilm and allow to prove for the final time
Let’s make the tadka bake the Tadka Focaccia
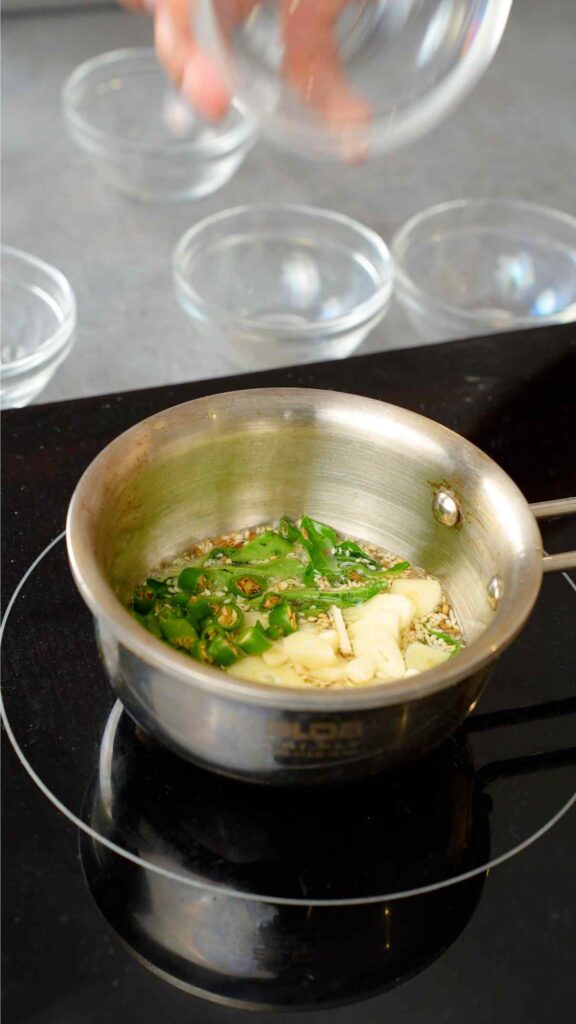

1) Heat the olive oil and add the mustard seeds. As soon as they splutter, add the cumin seeds, sesame seeds, curry leaves, garlic, and green chillies
2) Reduce the heat and temper for around 3-4 minutes over a low heat. We’re just aiming to activate the flavour compounds, cook out the rawness, and infuse the oil. Then allow the tadka to cool completely

3) Once the dough has proved, it’ll be super airy!
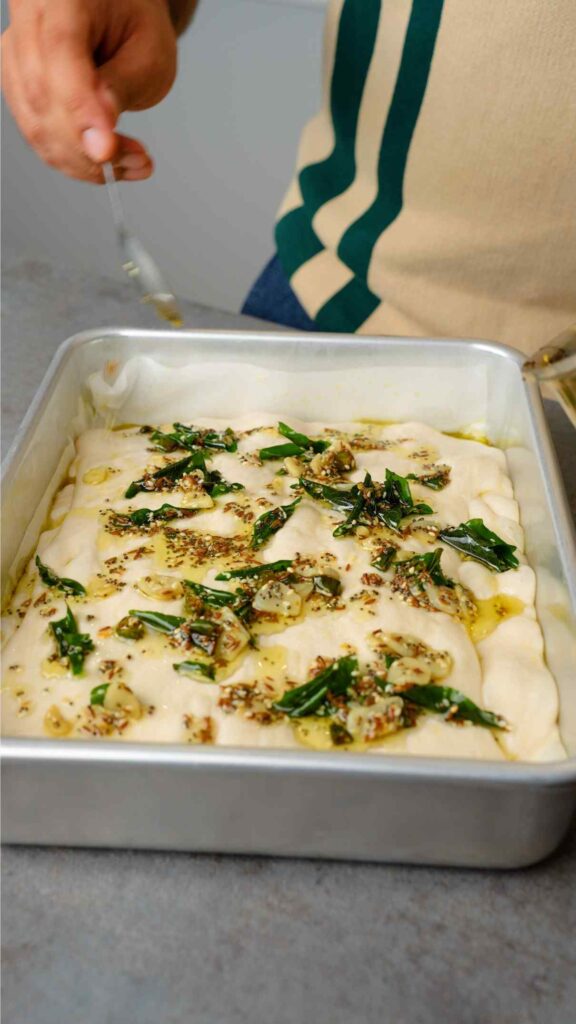
4) Spoon the tadka all over the dough
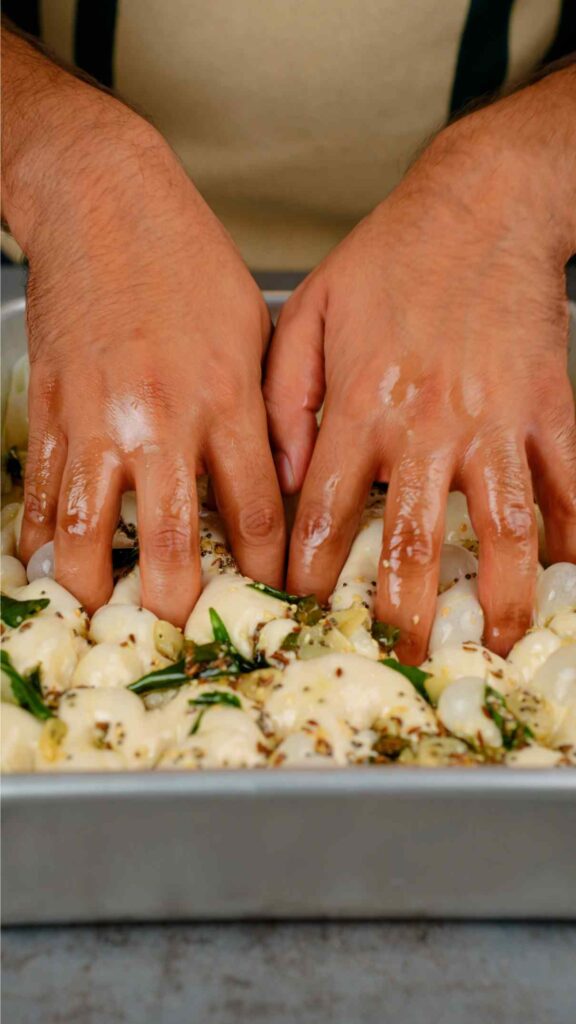

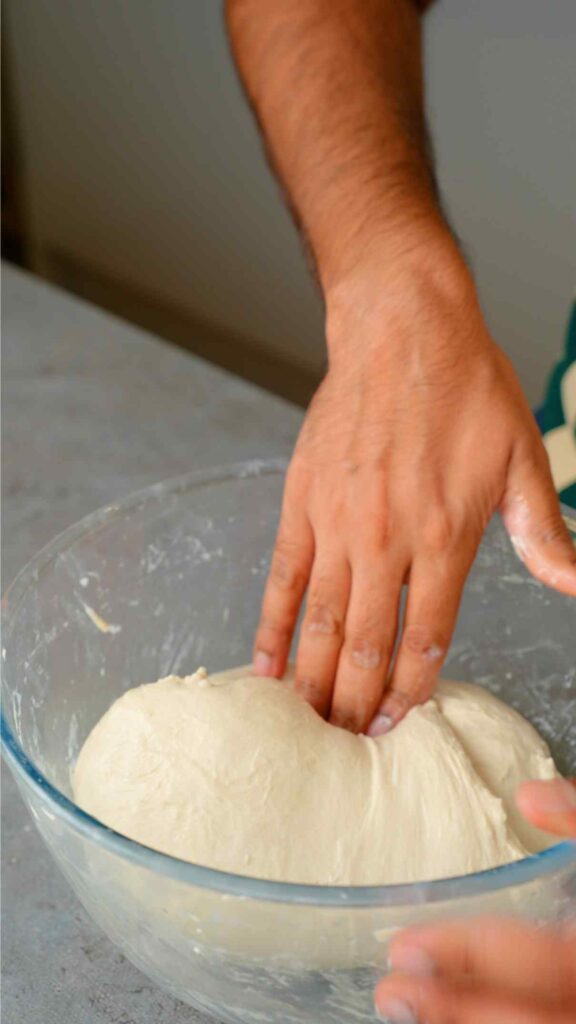
5) And then with oiled hands start gently dimpling the focaccia dough all over. This will help to embed the tadka and create the focaccia air bubbles we all love
6) Once it looks like this, it’s ready to be baked (see recipe below for oven temp and time)
Frequently asked questions
How long will the focaccia keep? What’s the best way to store focaccia?
The focaccia will keep for 2 days in an air tight container at room temperature. It will keep for 5-6 days refrigerated in an air tight container.
Slices can also be frozen by placing on a tray lined with baking paper, then frozen for 2 hours. After which they can then be transferred to a freezer-safe bag or container and kept for up to a month.
How to reheat focaccia?
Wrap the focaccia in some foil or baking paper and place into a 150’C/300’F oven for around 10 minutes.
If you enjoyed this recipe
Please do let me know! Leave a review and a rating below, I’d love to know how you got on.
You can also tag me on Instagram at @dish_by_rish. Or follow me on Facebook, Pinterest, Youtube, and TikTok to keep up with all my cooking and baking creations.
Until then, happy focaccia-making!
Tadka Focaccia
This no-knead Tadka Focaccia is crisp and airy. Topped with a tempering of curry leaves, spices, and aromatics for a fragrant fusion focaccia.
Ingredients
For the focaccia dough:
- 500g white bread flour
- 450g cold water (*see notes)
- 3g instant yeast/4g active dry yeast/10g fresh yeast
- 12g salt
- 12g extra virgin olive oil (~1tbsp)
For the tadka:
- 50g olive oil (~4tbsp) (see notes)
- 2tsp mustard seeds
- 2tsp white sesame seeds
- 2tsp cumin seeds
- Large handful of curry leaves
- 3 green chillies, sliced
- 6 cloves of garlic, sliced
Additional
- 4tbsp extra virgin olive oil for baking tray
Instructions
For the focaccia dough:
- Start by mixing together the flour, salt, and yeast. Don't pour the salt directly on top of the yeast (or vice versa) as it will deactivate it
- Then pour the water into the bowl with the flour and start mixing everything together either by hand or with a fork until it is well mixed and no dry flour remains. This should only take a few minutes
- Once mixed, cover the bowl with a lid or clingfilm and allow to sit on the counter at room temperature for 1 hour. This is known as autolysis which allows the flour to hydrate and initiate gluten development
- After the hour, the dough will already feel stronger and more cohesive. Pour the 12g of extra virgin olive oil directly on top and we can then start doing the stretch and folds (as we won't be doing any kneading due to the high hydration of the dough)
- Start by dampening you hands in water (to prevent sticking) and then pick up any side of the dough, gently stretch up and then fold over onto the other side of the dough, gently pressing in
- Then rotate the bowl and pick up another segment of dough and repeat the same motion. Keep repeating this as you rotate the bowl, you should get anywhere from 6-8 folds per each stretch and fold cycle
- After folding, cover the bowl with a lid or clingfilm and allow the dough the rest for 15 minutes. Then repeat the stretch and folds once again. We'll be doing 4 rounds of stretch and folds with 15 minutes of rest between each round. This will take around an hour
- The focaccia dough will feel stronger and more cohesive after each round as it continues to develop gluten and strengthen
- Immediately after the final stretch and fold, flip the dough over so it is now seam-side down. With damp hands, just lightly tuck the edges of the dough underneath to form a smooth round dough
- Cover with a lid or clingfilm and place into the fridge to cold prove for at least 24 hours (up to 72)
For the tadka:
- Pour the olive oil into a tadka pan or small saucepan and place over a medium heat. Then add the mustard seeds, as soon as they splutter add the cumin seeds, sesame seeds, curry leaves, garlic, and green chillies
- Reduce the heat and temper for around 3-4 minutes over a low heat. We're just aiming to activate the flavour compounds, cook out the rawness, and infuse the oil. Then allow the tadka to cool completely
Final shaping and baking the Tadka Focaccia:
- After the focaccia dough has proved in the fridge, it will be very bubbly
- Line a 31x20cm tray with a sheet of baking paper (makes it easier to remove the focaccia later) and then drizzle generously with extra virgin olive oil (around 4tbsp). I also like to place some oil under the paper to help keep it in place, butter works too. Spread the oil evenly across the base and the sides of the tray
- Drizzle a very small amount of oil around the outside of the dough inside the bowl, and gently remove with either a dough scraper or by hand. There's no need to punch the dough down, we're aiming for minimal disruption. The oil around the sides will aid with removing the dough. A dough scraper will be the most effective tool for this
- The focaccia dough will look rough and not in the ideal shape for this tray - so let's fix that
- With oiled hands, grab one end of the dough and fold it onto itself, just half way across the rest of the dough. Then repeat on the other side - this is called a letter fold
- Then flip the dough over so that it is seam-side down
- We're now going to do a coil fold which involves lifting the dough up at the mid way point and tucking one end under itself
- Now repeat the coil fold for the other side, and you'll now have a perfectly shaped dough. Just shuffle it around a little bit so that is is now centred in the tray. Cover with a lid or clingfilm and allow to prove for the final time (around 2-2.5 hours at room temperature)
- Preheat your oven to 270'C (fan)/290'C (conventional) or 520'F/550'F. This is the maximum setting on my oven, if your oven does not go this high, set it to the highest possible temperature. For best results place a baking steel or pizza stone into the oven to preheat as well
- Once the dough has proved, it'll be super airy and should have filled up most of the the baking tray, if not all of it
- Spoon the tadka all over the dough and then with oiled hands start gently dimpling the focaccia dough all over. Aim to dimple in the garlic, chillies, and curry leaves as they may burn if left exposed too much
- Place the focaccia into the oven and bake for 15 minutes. The total bake time will vary dependent on your oven temperature and whether or not you've used a baking steel/pizza stone. Keep an eye on the focaccia and remove once golden brown all over
- Allow to cool for 5 minutes before transferring to a wire rack to cool for another 15 minutes. Best served warm or at room temperature and it is also best served on the day it is made
- To re-heat, place into 150'C/300'F oven for around 10 minutes
Notes
- *If using instant yeast, use cold water as it will slow down the yeast activity, we don't want a fast rise here. If using active dry yeast or fresh yeast, bloom in 100ml of warm water, and once active, add to the flour along with 350ml of cold water
- With regards to olive oil, for the tadka portion I would recommend using a cooking olive oil as it has a higher smoke point when placed directly under heat
Nutrition Information
Yield 8 Serving Size 1Amount Per Serving Calories 371Total Fat 16gSaturated Fat 2gTrans Fat 0gUnsaturated Fat 13gCholesterol 0mgSodium 591mgCarbohydrates 48gFiber 3gSugar 0gProtein 8g
This is an automated calculation and hence may not be entirely accurate.
Followed exactly as written except used all purpose flour and topped with rosemary & sea salt instead of tadka (since it was my first ever attempt at focaccia) and it was EXCELLENT. My partner and I ate half of the loaf by ourselves in one sitting. Cannot wait to make this again but with the tadka!
Can’t wait till it’s it the oven! Just making it and used 500gr bread flower and measured 450g water – unfortunately the dough was so liquid, no stretch and fold was possible. Added more flour and now it’s better. Wondering why it became so liquid.
Hey Thomas! Please keep me posted on how it goes. The amount of water that flour can absorb can vary dependent on brand and pack. One of the reasons can be down to the protein % of the bread flour, the higher this is, the more water it will be able to hold. The bread flour I use has a protein content of 14%, I suspect yours may be lower if it lacked structure. But there are also other factors that can cause this too, humidity being one, coarseness of the grain, how much of the bran is still present. Good thinking on adding more flour!
Hey Rishi, thanks for replying! I added another 100g and then the dough was perfect. I checked my German wheat flour “Type 550” which is recommended for bread and doughs with yeast. It contains only 11/100g protein. I checked some other recipes and they call for 320-350g water only for 500gr aswell. Anyway – the result was amazing, but I can approve a few things. I put the tray on a pizza steel at 300°C, but it did not get crispy at the bottom – but the curry leaves burnt. Next time I will try without the pizza steel and put the try in a lower position in the oven. and I will take care to press the leaves into the dough. The smell and taste brought me and my friends to Karnataka :). Thanks for sharing your amazing food recipes!
Thanks for the update Thomas 🙂 Glad it worked out in the end! I just checked online – German wheat 550 is equivalent to what we call plain flour here, if you can source a bread flour equivalent over there it will improve the texture even further and allow for more a higher hydration (more water). The additional protein in bread flour also helps with getting a crispy airy dough too as it creates a stronger structure for air pockets. I appreciate you taking the time to leave your feedback, so many thanks! 🙂
Hello Rish,
Are the curry leaves dry or frozen?
Thanks
hey, they’re fresh curry leaves
I baked this and made it into a Bombay Style Green Chutney Aloo Masala Veg Cheese Sandwich. Turned out soo good, perfectly airy n soft, tasty n yumm in every bite for a Sunday meal. My parents and I enjoyed it and got over in a jiffy 😍🤌🏼!!! Thanks a ton for this recipe of Tadka on Focaccia, I have tagged you on my Instagram post n reel as well 🙏🏼🙏🏼🥰🥰!!!